
Yarn Swifts and Ball Winders Explained

The first time I brought home a hand-dyed hank, I remember thinking, “This is going to be magical.” It was magical right up until I tried to crochet from it like it was a normal ball and created a yarn spaghetti situation on my living room rug.
If you have ever wrestled a beautiful hank into a tangled mess, you are not alone. The good news is that a yarn swift and a ball winder turn that whole process into a calm little pre-project ritual. In this guide, I will walk you through what each tool does, how to set them up, and the small adjustments that make the difference between a neat center-pull cake and a snarl that steals your crafting joy.
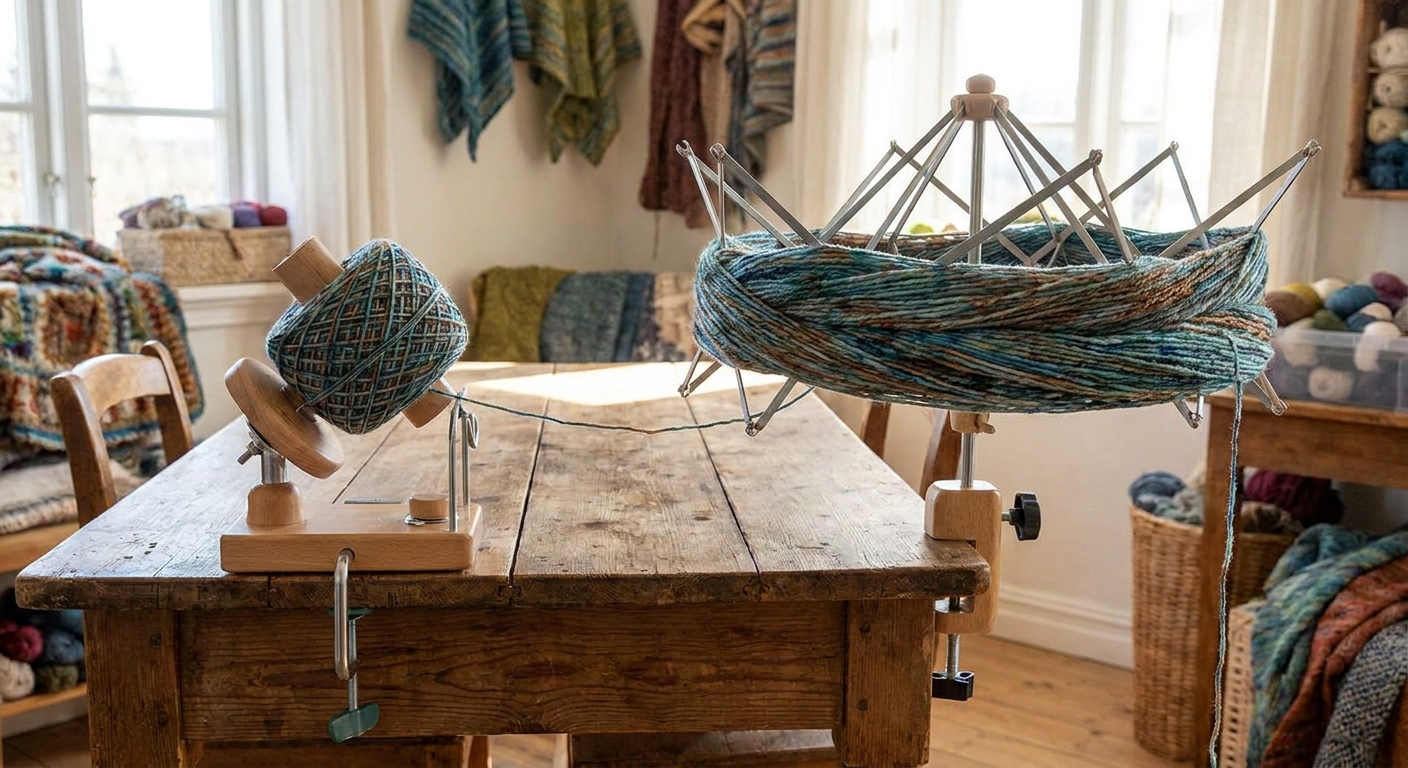
Hanks, balls, and cakes: why prep matters
A hank is yarn sold in a large loop that is twisted into a pretty braid for display. Many hand-dyed and indie-dyed yarns are sold this way because it shows off the colorwork and keeps the skein from stretching oddly on a store shelf.
The catch is that a hank is not meant to be worked directly. If you pull an end and start stitching, the loop collapses and the strands can cross and tighten into a knotty web.
When you “prep a hank,” you are changing it into something you can crochet or knit from smoothly:
- Ball: a round, hand-wound or machine-wound ball that feeds from the outside.
- Cake: a cylindrical shape, usually wound by a ball winder, that often allows center-pull use.
- Skein: a broad term. In yarn shops it often means the ready-to-use “pull skein” shape (like many acrylics). People also use it as a general term for a unit of yarn.
If you love colorwork, gradients, or speckles, prepping hanks is part of the hobby. It is worth getting comfortable with it.
What a yarn swift does (and what it does not)
A yarn swift’s job is simple: hold your hank open at a steady tension so it can spin freely while yarn is being wound off of it.
Think of the swift as the yarn’s dance partner. It keeps the loop spread out and lets it rotate smoothly so the hank does not flop into a tangle.
Common swift types
- Umbrella swift: Expands like an umbrella and usually clamps to a table. Very common, adjustable, and folds up for storage.
- Tabletop (amish) swift: Often a wood cross style that sits on a table or has a base. Quiet and pretty, but not always as size-adjustable.
- DIY swift alternatives: Two chair backs, a niddy noddy, or a helpful friend with arms out. These can work in a pinch, but they tend to add uneven tension and surprise snags.
What a swift does not do is wind the yarn into a usable shape on its own. For that, you either wind by hand or use a ball winder.
What a ball winder does (and why cakes are so popular)
A ball winder is a small hand-cranked (or sometimes electric) tool that winds yarn into a cake. The cake shape is stable, stacks nicely, and is easy to label and store.
The reason most of us adore cakes is the possibility of a center-pull start. When it works well, the yarn feeds from the center with very little rolling or bouncing.
Center-pull reality check
Not every cake behaves perfectly as a center-pull cake, and that is normal. The center can collapse a bit, or the first several yards might come out in a loose clump (the famous “yarn barf”). That does not mean you did it wrong. It usually means the cake was wound a little too loose, a little too tight, or the yarn is particularly springy.
What you need to wind a hank neatly
- Yarn swift (or a workable substitute)
- Ball winder (optional but very helpful)
- Scissors
- Two stitch markers or small bits of scrap yarn to secure ends
- A yarn label system (even painter’s tape works) so you remember what the cake is later
If you are still building your toolkit, you might also enjoy my general yarn-focused guide hub: Yarn Crafts.
Step-by-step: how to wind a hank with a swift and ball winder
1) Find the ties before you do anything else
Most hanks are secured with a few small ties. Some are contrasting threads, some are the same color and hard to see. Before you open the hank, locate those ties so you do not accidentally cut the yarn itself.
- If the ties are removable threads, you can snip them carefully.
- If the ties are part of the yarn (rare, but it happens), do not cut. Instead, loosen and slide them off like little loops.
2) Open the hank and slip it onto the swift
Untwist the braid gently and open it into a large loop. Place the loop around the swift and then expand the swift until the yarn is held open.
You want it snug, not stretched. If it is stretched tight, the yarn will fight you and may snag. If it is too loose, it can droop and flip over itself.
3) Position the ball winder so the yarn feeds in a straight line
Clamp the ball winder to a stable surface. Place it close enough that the yarn travels from swift to winder without rubbing on chair backs, table corners, or your coffee mug.
Ideally, the yarn path looks like this:
- Hank on swift spinning freely
- Yarn travels smoothly through the air
- Yarn enters the winder guide with minimal side-to-side pulling
4) Find the outer end of the hank (not the inner loop end)
Hanks do not have a true “center,” but they often have two ends tucked under a tie. Pick one end and commit to it. If you can, start with the end that pulls smoothly without tightening the loop around the swift.
If you are not sure which end is happier, tug each end gently while watching the hank. Choose the end that releases yarn without cinching or hopping.
5) Start winding slowly and watch the swift
Attach the yarn to the winder as your model requires (some have a notch, some need a few wraps by hand). Then begin cranking slowly.
Your first goal is to confirm three things:
- The swift spins instead of dragging
- The yarn does not catch on a tie you missed
- The yarn feeds without sudden jerks
6) Maintain light, consistent tension with your fingers
I like to pinch the yarn lightly between my fingers an inch or two before it enters the winder guide. This keeps the cake tidy and helps avoid a super-soft cake that collapses.
Use gentle tension. If you squeeze too hard, you can stretch the yarn, especially wool and alpaca blends, and that can change the feel of your finished fabric.
7) Stop immediately if you feel a snag
Snags are your early warning system. Stop cranking the moment you feel resistance. Rotate the swift by hand and look for:
- A strand crossing over another strand (a loop flip)
- A leftover tie trapping a section
- A knot from the dyer (common and totally normal)
Fix it calmly, then resume. Powering through snags is how yarn breaks or tightens into a true knot.
8) Finish the cake and secure both ends
When you reach the end, crank until the yarn is fully wound and then remove the cake from the winder.
- Wrap the yarn tail around the cake a few times and tuck it under.
- Locate the center end (it will be in the middle “well”) and gently pull a small loop out. Secure it with a stitch marker so it does not vanish back inside.
If you are planning to substitute this yarn in a project, you may also like: Yarn Substitution for Knitting Patterns. The logic is similar for crochet when you are matching yardage, fiber behavior, and gauge.
How to wind without a swift (it is possible)
If you do not have a swift yet, you can still prep a hank with a little patience.
Option 1: Two chair backs
Place the hank loop around two chair backs spaced apart. Make sure the chairs cannot slide. Wind slowly, and pause often to keep the loop from slipping down.
Option 2: Around your knees (seated winding)
This is my “I just want to start tonight” method. Sit with your knees slightly apart and loop the hank around them. You can hand-wind into a ball. It works, but you have to be very steady and take breaks to avoid twisting the loop.
Option 3: Enlist a patient helper
A friend holding the hank open can work, but only if they are willing to stand still and keep even tension. Uneven arm movement causes sudden tugs and tangles.
Common problems and gentle fixes
The swift will not spin smoothly
- Cause: Hank is too tight on the swift or the swift is rubbing against something.
- Fix: Loosen the swift slightly. Reposition so nothing touches the spinning arms.
My cake is floppy and collapses
- Cause: Wound too loosely, often from zero finger tension.
- Fix: Add light tension with your fingers while winding. If it is already wound, you can re-wind the cake with slightly more tension.
My cake is rock hard
- Cause: Too much tension while winding or cranking very fast.
- Fix: Rewind with less tension. A rock-hard cake can stretch yarn and make it feel thinner when you crochet.
The yarn keeps splitting while winding
- Cause: A splitty ply combined with high speed, rough guide hooks, or sharp angle feeding.
- Fix: Slow down, smooth the angle so the yarn path is straight, and use slightly less tension. If splitting is also happening during knitting, my troubleshooting guide may help: Stop Yarn Splitting While Knitting.
I found a knot in the hank
- Cause: Dyer join, mill join, or a break repaired during processing.
- Fix: Keep winding. When you reach the knot, decide whether to leave it (fine for some projects) or cut and rejoin later in a less visible spot.
Should you wind hanks right away or keep them as hanks?
I do both, depending on the yarn and my plans.
- Wind right away if you want to swatch soon, you worry about tangles, or you bought multiple hanks and want them project-ready.
- Keep as a hank if you will store it for a long time and the yarn is delicate or prone to stretching. Some fibers can relax and grow if stored under tension, and an overly tight cake can encourage that.
If I wind early, I keep the cake loosely banded with the label so I do not forget fiber content and yardage.
Quick safety and comfort tips (your hands matter)
- Clamp securely. A wobbly winder is a recipe for frustration.
- Crank at an easy pace. Speed does not prevent tangles. Attention does.
- Take breaks. Winding several hanks in a row can bother wrists and shoulders.
- Watch for pets. A spinning swift is basically a cat invitation.
If you deal with hand fatigue, you may appreciate: Ergonomic Knitting With Chunky Yarn. Even though it is written for knitters, the body mechanics and comfort habits translate beautifully to crochet too.
FAQ
Do I need a ball winder if I have a swift?
No. A swift simply holds the hank. You can wind by hand into a ball while the swift turns. A ball winder just makes it faster and gives you cakes that store neatly.
Why does my center-pull cake vomit yarn?
Usually because the center is loose or collapses a bit. Pull out the loose clump calmly, rewind it by hand into a small ball if needed, and keep going. It often settles after the first few minutes of stitching.
Can I wind multiple hanks together to blend dye lots?
Yes, and it is a smart habit for subtle variation. Wind one hank, then alternate sections (or strands) as you go. Just keep everything tidy so the strands do not twist around each other.
Should I rewind cakes before using them?
If a cake is extremely tight or oddly shaped, a quick rewind can help. Otherwise, you can usually crochet straight from the cake. If you are doing a project that is sensitive to tension, a relaxed, evenly wound cake tends to behave best.
A calm little finishing ritual
Once your yarn is wound, take ten seconds to make it truly project-ready:
- Secure the center end with a stitch marker
- Secure the outer end with a tuck or marker
- Wrap the label around the cake or tie it on with scrap yarn
That tiny bit of prep is what keeps your hand-dyed treasure feeling like a treat instead of a test.